Driver for 1-Wire sensor bus
-
Yes thanks @Kit-Bishop - opkg update revealed the w1-packages. And kmod-w1-gpio-custom looks promising. Unfortunatelly the dependencies can not be satisfied, since w1 packages require kernel 3.18.20 but the Omega already has kernel 3.18.23 after the update. Where can I adjust the dependencies? (The option --force-depends did not work and led to further issues.)
-
Anyone have any luck with 1-wire interface yet?
I use DS18B20 sensors with arduino. I need sensors rated for up to 100C for my brewery project, so DHT11 or DHT22 are not an option. I would like to eventually run everything from the onion without an arduino dock.
-
Looks good - a friend of mine got the 1-wire interface up and running with the onion omega. But he had to compile the firmware all from scratch.
I would rather like to stick with the original distro. But a dependency issue keeps me from installing the required package kmod-w1-gpio-custom
opkg -A depends kmod-w1-gpio-customkmod-w1-gpio-custom depends on:
kernel (= 3.18.20-1-7bed08fa9c06eb8089e82c200340ec66)
kmod-w1
kmod-w1-master-gpioBut checking the kernel
opkg info kernel- Package: kernel
- Version: 3.18.23-1-65008811ac4622ed020e0bf6384ece5a
tells that the package requires an older kernel or the package dependencies need to be adjusted. Does anyone know how to get the package kmod-w1-gpio-custom installed?
-
@Omega303 I can include it in the Omega firmware: gimme about an hour
")
EDIT: yikes, the openwrt build is having some issues. I'll try to resolve it tonight but it might have to wait until tmrw.
-
Thanks so much @Lazar-Demin for looking into it. I really appreciate your efforts.
-
@Omega303 @Jonathan-Miller @Kit-Bishop
Ok, I've sorted out the build issue.Run
oupgrade -l -fto pickupb269, it includes the following kernel modules:kmod-w1kmod-w1-gpio-customkmod-w1-master-gpio
Let us know how it goes!
-
Really great, thanks @Lazar-Demin the upgrade went well

The 1-wire interface seems to be initialized on the onion. But - shame on me - I missed the actual driver for the thermal sensors. The driver is included in kmod-w1-slave-therm
Could you add this package possibly?
-
@Omega303 no prob, its added in
b270
-
Newbie here -
I have a Gikfun DS18B20 sensor similar to the above (http://www.amazon.ca/gp/product/B012C597T0) -- I wired it like so: http://monosnap.com/image/HSxZm5p6mUS8iF5uvhtqgJxtScR7te
From what I can tell I have the latest firmwire cited above:
Firmware 0.0.6 (b270)
Latest Firmware 0.0.6 (b266)My understanding is I need to figure out how to compile this: https://github.com/milesburton/Arduino-Temperature-Control-Library
Any tips to get this compiled and get a reading? Or is there anyway to use the fast-gpio tool from onion?
-
@Omega303 what did you do to read with kmod-w1-gpio-custom?
-
Started to follow http://squidge.sourceforge.net/w1/ but I don't see a file named /etc/modules.d/<load sequence>-w1-gpio-custom to configure which pin is being used?
Also, tried reading with fast-gpio but I'm just getting a reading on 0 - should I expect a reading from this?
-
 SUCCESS Thanks @Lazar-Demin - for getting the packages for 1-Wire interface into the Omega firmware.
  21.875°C is the first temperature I read from a DS18B20 via Onion Omega. I am putting together a tutorial to document the steps needed to get the 1-Wire interface up and running. What is your preferred format? Is markdown sufficient?
@Nathan-Bertram : You need the kmod-w1-gpio-custom to tell the 1-Wire interface to which GPIO pin you connect your data wire. Thats done by creating a file at
- /etc/modules.d/55-w1-gpio-custom
containing only one line:
w1-gpio-custom bus0=0,19,0where 19 is GPIO pin (replace that number by the pin your sensor is connect to)
-
@Nathan-Bertram If the 1-Wire interface is set up and a device connected you can read by
cat /sys/devices/w1_bus_master1/28-01234567890a/w1_slavewhere 28-01234567890a is the sensor id. This file only exists if all modules loaded correctly and an device is connected.
-
@Omega303 ok sweet - I got the w1 running it seems thank you! The sensor id folders keep changing with no w1_slave file present (which I assume means it keeps trying to detect my sensor but isn't getting data from pin 0 as I configured it. Do I need to put a resistor or does my current setup look correct (5V red, GND black and yellow pin 0) http://monosnap.com/image/HSxZm5p6mUS8iF5uvhtqgJxtScR7te ? (I checked the current I'm getting 5v which means I didn't totally botch the soldering job)
root@Omega-088F:/sys/devices/w1_bus_master1# cat /etc/modules.d/55-w1-gpio-custom
w1-gpio-custom bus0=0,0,0

root@Omega-088F:/sys/devices/w1_bus_master1# ls -la /sys/devices/w1_bus_master1
drwxr-xr-x    4 root     root             0 Jan 27 03:47 .
drwxr-xr-x    6 root     root             0 Jan  1  1970 ..
drwxr-xr-x    2 root     root             0 Jan 27 04:03 00-280000000000
drwxr-xr-x    2 root     root             0 Jan 27 04:03 00-c80000000000
lrwxrwxrwx    1 root     root             0 Jan 27 03:47 driver -> ../../bus/w1/drivers/w1_master_driver
lrwxrwxrwx    1 root     root             0 Jan 27 03:47 subsystem -> ../../bus/w1
-rw-r--r--    1 root     root          4096 Jan 27 03:47 uevent
-rw-rw-r--    1 root     root          4096 Jan 27 03:47 w1_master_add
-r--r--r--    1 root     root          4096 Jan 27 03:47 w1_master_attempts
-rw-rw-r--    1 root     root          4096 Jan 27 03:47 w1_master_max_slave_count
-r--r--r--    1 root     root          4096 Jan 27 03:47 w1_master_name
-r--r--r--    1 root     root          4096 Jan 27 03:47 w1_master_pointer
-rw-rw-r--    1 root     root          4096 Jan 27 03:47 w1_master_pullup
-rw-rw-r--    1 root     root          4096 Jan 27 03:47 w1_master_remove
-rw-rw-r--    1 root     root          4096 Jan 27 03:47 w1_master_search
-r--r--r--    1 root     root          4096 Jan 27 03:47 w1_master_slave_count
-r--r--r--    1 root     root          4096 Jan 27 03:47 w1_master_slaves
-r--r--r--    1 root     root          4096 Jan 27 03:47 w1_master_timeout
-
@Omega303 that's awesome! yeah, markdown would be great. let me know when it's ready and we can throw it into the Onion wiki.
Or you can make a push request to the wiki repo directly: https://github.com/OnionIoT/wiki
-
@Lazar-Demin said:
Hello,
Is there a way how to check this ? I mean using a temperature sensor.
I've been reading this post, and none of the folders / file exists on my Onion.
Just updated to the latest version.
Thanks,
Miguel
-
Hi for example I've this:
root@Omega-276D:/etc/modules.d# ls gpio
30-gpio-button-hotplug 58-i2c-gpio-custom spi-gpio
30-gpio-irq 59-i2c-gpio w1-master-gpio
50-ledtrig-gpio 60-leds-gpioWhich one should I use ?
Thanks,
Miguel
-
@Miguel-Peredo it looks like @Omega303 is still in the process of putting together a guide
")
What @Omega303 mentioned above is you do following steps to get the 1 wire running:
-
Upgrade your firmwire to the latest (via the gui under settings is easiest)
touch /etc/modules.d/55-w1-gpio-custom
vi /etc/modules.d/55-w1-gpio-customThen add this one line (replace 19 with the pin # you want to use):
w1-gpio-custom bus0=0,19,0- Restart your onion. Then you should see contents in /sys/devices/w1_bus_master1/* now ... if your device is plugged in then there should be a file reading /sys/devices/w1_bus_master1/28-DEVICEID/w1_slave (28-DEVICEID where * is the id of your device)
I'm currently not getting a read from #3 - so that's where I'm stumped (any advice with the comments above?)
 but at least I know w1 is running.
-
-
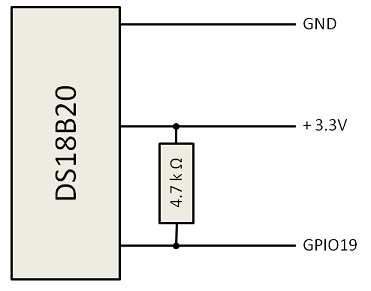
@Nathan-Bertram Although I found a DS18B20 spec telling the sensor can be driven from 3.0 to 5.5 Volts, I recommend the 3.3 V instead of 5V. But more important is to insert a 4.7 kOhm resistor between data pin and GPIO. I think the missing resistor disables proper communication. The sensor id needs to remain the same - it is the hardware address for the 1-wire master to request data. Here is how I connected the sensor:
-
@Omega303 ah... I tried hooking up a a 4.7k resistor last night but obviously read the diagram incorrectly: http://monosnap.com/image/ideZC9zI136vSFrAo9LC2747TTcqio not sure what i was thinking LOL -- I'll try again tonight and let you know how it goes. Thank you!