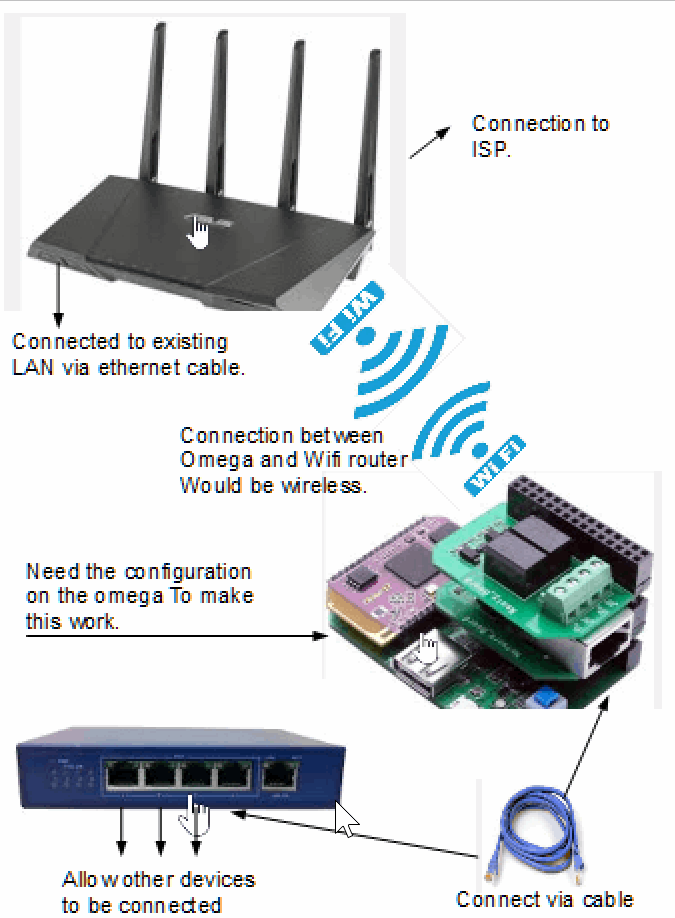
Wireless setup
-
@administrators How would the Omega be configured to make this happen.
-
I don't have the hardware to test these commands but I expect the following will get you going:
Add a bridge
brctl addbr br0
Then add teh interfaces to the bridge
brctl addif br0 eth0 wlan1Use ifconfig to see the names of your eth and wlan interfaces to see what you need to use in the above addif command.
You will probably need to put these commands into the startup script at /etc/rc.local
Good luck!
-
@administrators Thank you none, need more of a tutorial on how to setup this configuration. Also will need to know what affect existing wifi settings have on the bridge configuration. Maybe a factory reset then tutorial on how to set this up?
-
Did you check-out the "connectivity" tutorials here:
https://wiki.onion.io/Tutorials/Contents
?
-
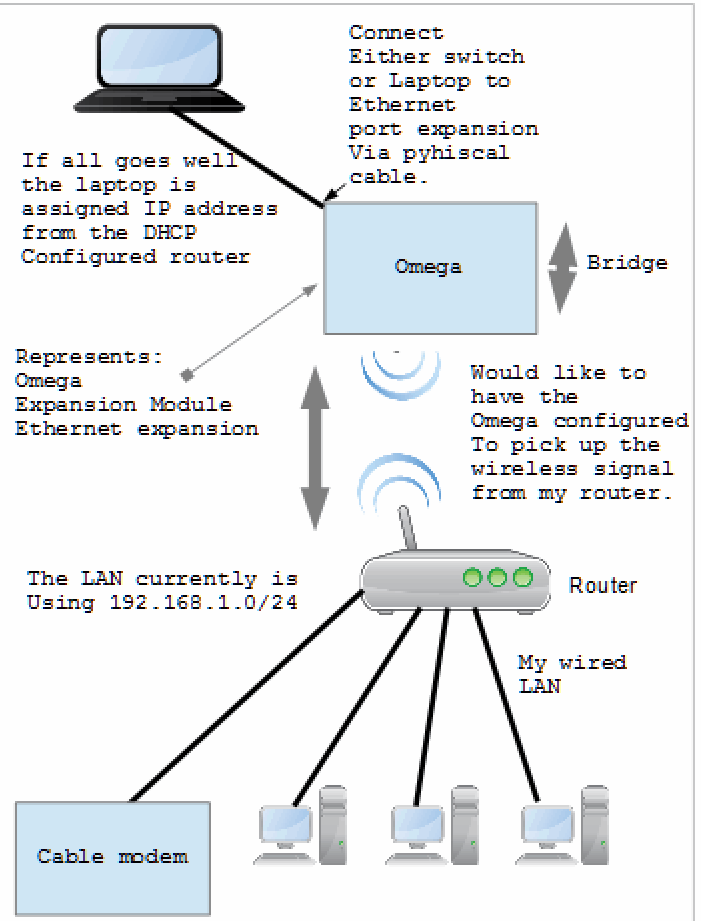
Part 1: Wireless connection between your Omega and Router
-
Power up your omega connected to the minidock.
-
Open a browser and go to the console @192.168.3.1 and log-in using the default settings or if you have already changed them use your new login
-
Go to the "Settings" app
-
On the dashboard on the left go to "Wif-fi settings" - here you need to scan and setup the omega to connect to your home network (main router/home router) - to do so search for the correct SSID broadcast by your router and set the correct security type and corresponding password. After you are done click the "Configure Wi-fi button"
-
Next, go to the "Wi-Fi AP settings" on the dashboard on the left. Here you have to first check the "Enable AP Mode" - Next, set an SSID of your choice - This will be the wifi network (range extended) that you will connect to. Set a security type and password. I normally keep these the same as that of the main router for simplicity. Next, click "Configure AP". It may or may not do anything at this stage. However the settings are made.
I would suggest a reboot of the omega at this stage.
And thats it!! now just connect your computer/smartphone to the wifi SSID you set with the password you chose and you are on the internet!
OR to do this from the command line, follow the instructions here:
https://wiki.onion.io/Tutorials/Using-Omega-As-Wifi-Range-ExtenderPart 2: Connection between your Omega and a LAN Switch
Use a PC/MAC and follow the instructions given here:
https://wiki.onion.io/Tutorials/Expansions/Using-the-Ethernet-ExpansionPart 3: Connecting to a switch
I think directly plugging it in to the switch at this point should work.
If you have the hardware, please try and let us know.NOTE: I would suggest that you uninstall "wpad-mini" and install "wpad" on the omega. I had a problem making a router out of the omega+ethernet exp and I was facing a lot of issue until I did this. More info on this: https://community.onion.io/topic/27/wifi-wpa2-eap-peap-mschapv2/9
-
-
Nayan, thank you so much for the detailed tutorial have copied and pasted it into my omega notes and will give it a shot today. Excited to try something new this will help alleviate some head banging against the wall.
-
You're welcome. Let us know if it works out. Also to answer your other question:
The omega will behave as a routed bridge in this case - meaning that it will assign addresses, maintain and manage the connection specifics of the devices connected to the switch (I am assuming you will be using a switch). So the ip addresses you see will be in the range from 192.168.3.2-200 or so. It will also be a private network of sorts (sorry I am not a networking expert to know the correct terminology) meaning that if you check on the main router you should be able to see only one IP address - that from the omega - your devices will be routed through the omega. I am not completely sure of the implications this will have on the speed of the connection but logically I assume it will be slower than connecting directly to the main router - unless you are not using any other device on the main router.
This is a very rough explanation from my limited understanding of how these things work. I am sure there are other experts around these communities who can give you a much more detailed explanation.
-
@Nayan got everything working with the exception of the wireless bridge can ping the Ethernet expansion IP address but still working on figuring out why devices on the switch connected to that port are not being seen. More reading and experimentation is at hand.
-
This post is deleted!
-
@Guest ... Are you able to access the internet from the devices connected to the switch?
-
@Nayan ran into some configuration problems, had to start over "factory reset". Will get back to the point I was and let you know.
Not sure what affect attempting to create the wireless bridge( if possible) has on other wifi configurations within the omega still searching.
-
Intern extraordinaire @Haoran-Li has made a tutorial that outlines all of the steps:
https://wiki.onion.io/Tutorials/Using-Omega-As-Wifi-Ethernet-Bridge
-
@Lazar-Demin Thank you for pointing me in the right direction. @Haoran-Li thank you for the tutorial nicely done. Now off to see if I can set this baby up.
-
@Lazar-Demin Just finished setting up the posting by @Haoran-Li
"Using the Omega as a WiFi Ethernet Bridge" but could not get connectivity via the ethernet port on the omega.
Wireless signal from Local router-->Omega receiving wireless signal --
-->Ethernet connection on omega has laptop connected and setup for DHCP. No traffic. Here are the files I configured as per write up.br-lan Link encap:Ethernet HWaddr 40:A3:6B:C1:17:0B inet addr:192.168.3.1 Bcast:192.168.3.255 Mask:255.255.255.0 inet6 addr: fe80::42a3:6bff:fec1:170b/64 Scope:Link UP BROADCAST MULTICAST MTU:1500 Metric:1 RX packets:751 errors:0 dropped:0 overruns:0 frame:0 TX packets:56 errors:0 dropped:0 overruns:0 carrier:0 collisions:0 txqueuelen:0 RX bytes:88965 (86.8 KiB) TX bytes:7642 (7.4 KiB) eth0 Link encap:Ethernet HWaddr 40:A3:6B:C1:17:0B UP BROADCAST MULTICAST MTU:1500 Metric:1 RX packets:812 errors:0 dropped:0 overruns:0 frame:0 TX packets:32 errors:0 dropped:0 overruns:0 carrier:0 collisions:0 txqueuelen:1000 RX bytes:104163 (101.7 KiB) TX bytes:2990 (2.9 KiB) Interrupt:4 lo Link encap:Local Loopback inet addr:127.0.0.1 Mask:255.0.0.0 inet6 addr: ::1/128 Scope:Host UP LOOPBACK RUNNING MTU:65536 Metric:1 RX packets:16 errors:0 dropped:0 overruns:0 frame:0 TX packets:16 errors:0 dropped:0 overruns:0 carrier:0 collisions:0 txqueuelen:0 RX bytes:1621 (1.5 KiB) TX bytes:1621 (1.5 KiB) wlan0 Link encap:Ethernet HWaddr 40:A3:6B:C1:17:0C inet addr:192.168.1.119 Bcast:192.168.1.255 Mask:255.255.255.0 inet6 addr: fe80::42a3:6bff:fec1:170c/64 Scope:Link UP BROADCAST RUNNING MULTICAST MTU:1500 Metric:1 RX packets:24475 errors:0 dropped:0 overruns:0 frame:0 TX packets:15448 errors:0 dropped:0 overruns:0 carrier:0 collisions:0 txqueuelen:1000 RX bytes:3508079 (3.3 MiB) TX bytes:1979404 (1.8 MiB) wlan0-1 Link encap:Ethernet HWaddr 42:A3:6B:C1:17:0C inet6 addr: fe80::40a3:6bff:fec1:170c/64 Scope:Link UP BROADCAST RUNNING MULTICAST MTU:1500 Metric:1 RX packets:0 errors:0 dropped:0 overruns:0 frame:0 TX packets:18 errors:0 dropped:0 overruns:0 carrier:0 collisions:0 txqueuelen:1000 RX bytes:0 (0.0 B) TX bytes:4095 (3.9 KiB) cat network config interface 'loopback' option ifname 'lo' option proto 'static' option ipaddr '127.0.0.1' option netmask '255.0.0.0' ```#config globals 'globals' # option ula_prefix 'fd28:1f13:5b38::/48' config interface 'lan' option ifname 'eth0' option type 'bridge' option proto 'static' option ipaddr '192.168.3.1' option netmask '255.255.255.0' option ip6assign '60' #config interface 'wan' # option ifname 'eth0' # option proto 'dhcp' #config interface 'wan6' # option ifname '@wan' # option proto 'dhcpv6' #config switch # option name 'switch0' # option reset '1' # option enable_vlan '1' #config switch_vlan # option device 'switch0' # option vlan '1' # option ports '0 1 3' config interface 'wwan' option proto 'dhcp' option hostname 'OnionOmega' #config interface 'wlan' # option proto 'static' # option ipaddr '192.168.3.1' # option netmask '255.255.255.0' #config interface 'wlan' # option ifname 'wlan0-1 wlan0' # option type 'bridge' # option proto 'static' # option ipaddr '192.168.3.1' # option netmask '255.255.255.0' # option ip6assign '60' cat firewall config defaults option syn_flood 1 option input ACCEPT option output ACCEPT option forward REJECT # Uncomment this line to disable ipv6 rules option disable_ipv6 1 config zone option name lan list network 'wlan' list network 'lan' option input ACCEPT option output ACCEPT option forward ACCEPT config zone option name wan list network 'wwan' #list network 'wan6' option input ACCEPT option output ACCEPT option forward REJECT option masq 1 option mtu_fix 1 config forwarding option src lan option dest wan # We need to accept udp packets on port 68, # see https://dev.openwrt.org/ticket/4108 config rule option name Allow-DHCP-Renew option src wan option proto udp option dest_port 68 option target ACCEPT option family ipv4 # Allow IPv4 ping config rule option name Allow-Ping option src wan option proto icmp option icmp_type echo-request option family ipv4 option target ACCEPT # Allow DHCPv6 replies # see https://dev.openwrt.org/ticket/10381 config rule option name Allow-DHCPv6 option src wan option proto udp option src_ip fe80::/10 option src_port 547 option dest_ip fe80::/10 option dest_port 546 option family ipv6 option target ACCEPT # Allow essential incoming IPv6 ICMP traffic config rule option name Allow-ICMPv6-Input option src wan option proto icmp list icmp_type echo-request list icmp_type echo-reply list icmp_type destination-unreachable list icmp_type packet-too-big list icmp_type time-exceeded list icmp_type bad-header list icmp_type unknown-header-type list icmp_type router-solicitation list icmp_type neighbour-solicitation list icmp_type router-advertisement list icmp_type neighbour-advertisement option limit 1000/sec option family ipv6 option target ACCEPT # Allow essential forwarded IPv6 ICMP traffic config rule option name Allow-ICMPv6-Forward option src wan option dest * option proto icmp list icmp_type echo-request list icmp_type echo-reply list icmp_type destination-unreachable list icmp_type packet-too-big list icmp_type time-exceeded list icmp_type bad-header list icmp_type unknown-header-type option limit 1000/sec option family ipv6 option target ACCEPT # include a file with users custom iptables rules config include option path /etc/firewall.user ### EXAMPLE CONFIG SECTIONS # do not allow a specific ip to access wan #config rule # option src lan # option src_ip 192.168.45.2 # option dest wan # option proto tcp # option target REJECT # block a specific mac on wan #config rule # option dest wan # option src_mac 00:11:22:33:44:66 # option target REJECT # block incoming ICMP traffic on a zone #config rule # option src lan # option proto ICMP # option target DROP # port redirect port coming in on wan to lan #config redirect # option src wan # option src_dport 80 # option dest lan # option dest_ip 192.168.16.235 # option dest_port 80 # option proto tcp # port redirect of remapped ssh port (22001) on wan #config redirect # option src wan # option src_dport 22001 # option dest lan # option dest_port 22 # option proto tcp # allow IPsec/ESP and ISAKMP passthrough #config rule # option src wan # option dest lan # option protocol esp # option target ACCEPT #config rule # option src wan # option dest lan # option src_port 500 # option dest_port 500 # option proto udp # option target ACCEPT ### FULL CONFIG SECTIONS #config rule # option src lan # option src_ip 192.168.45.2 # option src_mac 00:11:22:33:44:55 # option src_port 80 # option dest wan # option dest_ip 194.25.2.129 # option dest_port 120 # option proto tcp # option target REJECT #config redirect # option src lan # option src_ip 192.168.45.2 # option src_mac 00:11:22:33:44:55 # option src_port 1024 # option src_dport 80 # option dest_ip 194.25.2.129 # option dest_port 120 # option proto tcp
-
@Lazar-Demin When finished with the "Using-Omega-As_WiFi-Ethernet-Bridge" will it function as shown? Failed on my first configuration attempt. Attempting a second setup but wanted to show what my configurations look like (show above this post) and convey my expectations. Sounds like it is getting closer.
-
@Nayan Sorry for the delay have been trying to get this working. Answering your question no devices can not see the internet.
-
@Guest In the post with all of the configuration files, can you please edit the post to format the settings with code syntax? It's incredibly hard to read with the current formatting.
There's a guide here: https://github.com/adam-p/markdown-here/wiki/Markdown-Cheatsheet#codeI'll ask @Haoran-Li to take a look, meanwhile you should experiment as well, we definitely welcome innovation in the community
-
@Lazar-Demin Think I figured it out let me know if it needs anymore editing.
-
@Guest very legible now, thanks!
-
@Guest... Just curious whether you were able to get it working finally... ?