LunchBox Gazette
-
A New Take on an Old Project
If you’re like me, I’ll bet that you can’t get the Onion IoT Thermal Printer project to work (from “Onion Omega2 Project Book Vol. 1, R.0.1”). Other than a few little programming nits, the biggest issue that prevents this project from working for me, is the lack of the ability to configure the printer’s operational parameters. Granted, I’m not using the printer cited in the Onion project. Rather, I am using the SparkFun Electronics (SFE) Thermal Printer (COM-10438; now on sale for a ridiculously inexpensive $40). And this SFE printer needs a whole raft of command codes to be sent to it prior to printing. Primarily, the baud rate must be set at 19,200 bits per second (bps) or the output will be gibberish. And that’s exactly what I was printing with the stock Onion project.
Now back to the future with LunchBox Gazette.
LunchBox Gazette is the name that I’ve given to this little project. Basically, this project prints a short “newsletter” that I insert into my daughters’ lunchboxes each day. For several years, I’ve been using an Arduino microcontroller for publishing the LunchBox Gazette. The biggest headache with this antiquated setup was that the Arduino had to be reprogrammed each day with the current news. What a drag! My discovery of the Onion Omega2 changed all of that, though. Out with the Arduino and in with an Onion Omega2 and Onion Arduino Dock 2.
In a nutshell, here are all of the steps needed for building your own LunchBox Gazette or, at least, getting the Onion IoT Thermal Project to work properly:
-
Follow all of the Onion Omega2 operating system and software setup configuration procedures. An Omega2 will work perfect for this project.
-
Replace the Onion-suggested Mini Dock with the Arduino Dock 2. Follow the Onion instructions for the setup of the Arduino Dock 2.
-
Install the Onion IoT Thermal Printer software (https://github.com/OnionIoT/iot-thermal-printer). Edit the “Print.html” file for adding your own personal touches to the final prints. These entries are only the “boilerplate” text that is printed on every newsletter. You will use Step 8 for adding daily customized text to your prints.
-
This step will correct one of the “other” errors which will prevent the Onion IoT Thermal Printer software from running. Install the Onion Base_WWW_Master software (https://github.com/OnionIoT/base-www). This step will ensure that jquery.js is installed on your Omega2. Without this step, the Omega2 will not be able to send any data to the printer.
-
Download and edit the SFE Thermal Printer Code example (https://github.com/sparkfun/Thermal_Printer/blob/master/Firmware/ThermalPrinter_Example.ino) for sending command codes to the printer and printing the serial content from the Omega2. Note that you will need to declare the Arduino Dock 2’s Tx and Rx pins, read the serial data string from the Omega2, and send the string to the printer. I used pins D2 (Tx) and D3 (Rx) and the declaration for these pins used during the instantiation of the Thermal object (SoftwareSerial Thermal (3,2);). Use the wireless programming instructions from Onion for flashing this edited printer file onto the Arduino Dock 2.
-
Connect the Arduino Dock 2 to the SFE thermal printer as directed in the Onion project instructions. Please note, if you’re experienced with project building you can connect the 5V power supply to a scrap Micro-B USB cable and power both the printer and the Omega2 from the same barrel jack input. This step will require cable modification, precision wiring, and careful soldering. This is not for the timid or inexperienced builder, but it IS a very slick modification.
-
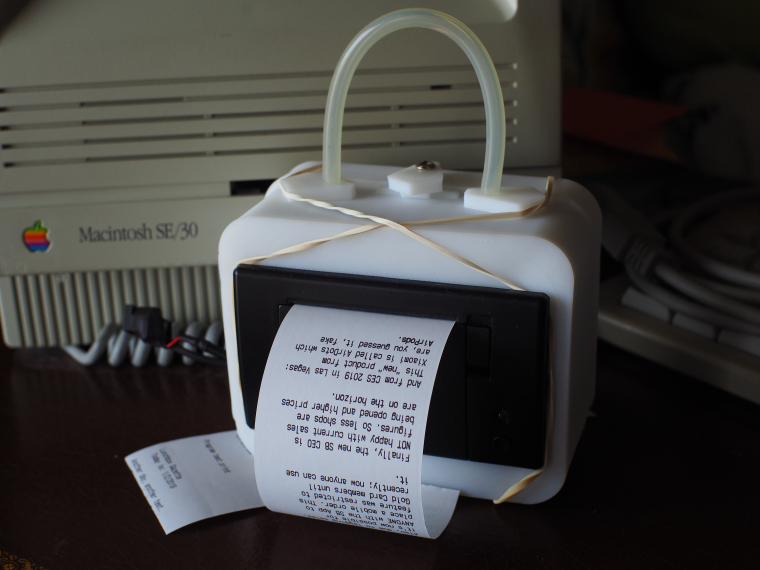
Carefully assemble your Omega2, Arduino Dock 2, and SFE Thermal Printer into your preferred enclosure. In my case, a made a 3D-printed “lunchbox” to hold this contraption. I used elastic bands to hold the front and back together so that I could get inside for hardware maintenance, if needed.
-
Now the moment of truth—fire it up! Wait for the Omega2 to initiate its WiFi hotspot access point and connect with anything that has a browser (e.g., phone, tablet, computer). Once you have established a WiFi connection with the Omega2, open your browser and load the print.html page. You might have to use either the Internet protocol (IP) address (e.g., http://198.162.x.x/print.html) or the more friendly URL (http://Omega-xxxx.local/print.html). In my limited testing, I found that iOS Safari might not work, while Google Chrome (or Chromium) will work.
-
New enter some text into the on-screen box and press the “Print” button. Within a couple of seconds, you should see a printout of your entered text.
Congratulations; it worked! You now have your own mobile print shop.
Oh, and if you liked this project, please stay tuned, I have several more Omega2 projects coming up.
-