Using Touch Screen with Omega2
-
Just wondering if anyone has had any experience using a touch screen with an omega project. I am trying to find a suitable touch screen if anyone has any recommendations? (specific links)
I've noticed most are shields for the arduino and rely on arduino libraries, so if there is a workaround for that besides the dock please enlighten me.
I would like to use the SPI capabilities of the omega to interact with the screen.
Thanks
-
@Angus-Ryan I'm currently experimenting in this field. I want to use the existing linux' frame buffer
fbtftdrivers as a solid abstraction layer to the display hardware and not directly talking to the controller chips.
Drivers exist in the linux kernel tree for ILI93xx, SSD13xx and other popular chips used in small TFT and OLED displays.On top of the frame buffer device, I intend to use the LittlevGL on top as the toolset to create GUIs.
I have just started experimenting, but there are other users who already have worked with fbtft and have posted useful info here and here.
As far as I can see in Onion's published fork of OpenWrt, the
fbtftkernel drivers are not yet included in the Omega builds.My goal is to create proper patch sets to enable TFT support in a clean openwrt tree, and provide the needed packages to build littlevGL in my own openwrt feed
I just started doing that, I'll keep you posted about progress.
About specific links - I ordered this one from ali express to start with - it uses the ILI9341 chip. Hasn't arrived yet, hope it'll work
")
-
@luz Thanks that is a perfect response, please do keep me updated !
-
A bit of progress:
I have created a patch that can be applied to the openwrt 18.06.2 tree which makes fbtft and all fb_xxx chip drivers available in
make menuconfig, under Kernel Modules -> Video Support -> kmod-fbtft-support.The main patch that adds these options is this one.
To make sure the build does not try to create a VGA console, I also added another small patch.
Finally, if you do this on a fresh OpenWrt 18.06 tree (and not on the onion fork which already contains mt7688 SPI fixes), you also need:
- this one for making MT7688 hardware SPI work at least in pseudo-fullduplex (real full duplex is broken in MT7688 hardware) and to allow SPI transfers >16bytes.
- and this one is not technically needed but nice to have because it fixes the bogus error message at startup regarding SPI and DT.
With these patches in place, you can select fbtft and a suitable display driver in menuconfig (I use fb_ssd1306 with a tiny 128x64 OLED for now, because that's the only display I have right now, the bigger color LCDs I ordered haven't arrived yet). Then build the firmware and install.
fbtftand all dependencies are autoloaded at startup, but the actual display must be instantiated as follows:# load the chip driver insmod fb_ssd1306 # parametrize it via the `fbtft_device` helper module insmod fbtft_device custom name=fb_ssd1306 busnum=0 cs=1 speed=16000000 mode=0 fps=50 gpios=reset:0,dc:1 width=128 height=64 verbose=3After that, the linux framebuffer console automatically kicks in and the display shows a blinking cursor
")
clear >/dev/tty1
echo "Hello World!" >/dev/tty1
echo "Hello Omega!" >/dev/tty1
echo "Hello OLED!" >/dev/tty1
# connect a USB keyboard and have a supertiny console:
login -f root </dev/tty >/dev/tty1 2>&1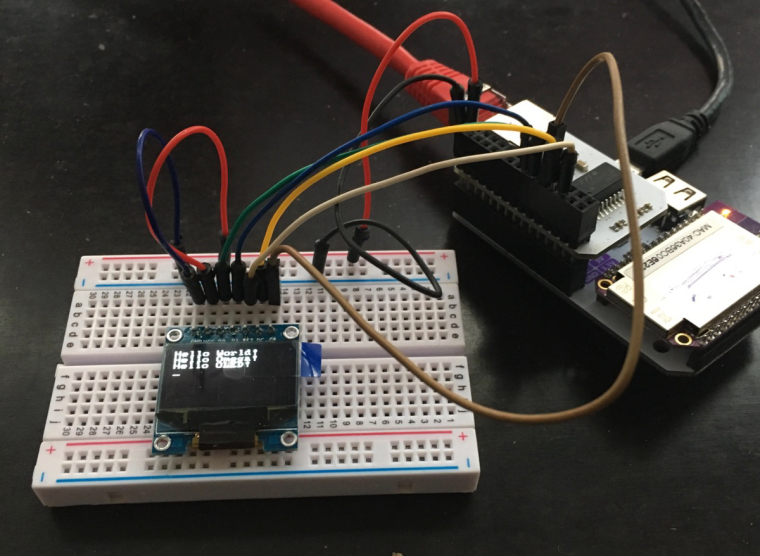
This type of display with so-called 4-wire SPI needs some extra signals (dc, reset, see
gpiospart in theinsmod fbtft_devicecommand). The complete wiring of what you see in the photo is:- GND = GND
- VCC = 3.3V
- D0 = SCK -> Omega SCK/GPIO7
- D1 = MOSI -> Omega MOSI/GPIO8 (NOTE: Omega2 does not coldboot when this is connected to the SSD1306 OLED, probably need to add resistor into the line or remove pullup/down on the display itself)
- RES = Reset -> Omega GPIO0
- DC = Data/Command -> Omega GPIO1
- CS = Chip Select -> Omega CS1/GPIO6
Next step will be a sample app with LittlevGL but probably I'll wait with that until I have a color display, will be more fun then