Zero-Touch Provisioning on Boot
-
Need an easy, effective way to spin up new devices directly after a factory reset from either an SD Card or Serial connection, provisioned to connect to our network with our software already loaded. A simple "dump these files in these locations" would work, but going through setup manually is time consuming for provisioning 3 or 4 omegas, and I need to provision a stack of 20.
-
I have a jig that I use to set up a few hundred Omega2+ with.
Everything you do from the Onion html setup page from upgrading the omega firmware to resetting it via firstboot -y etc can be automated from the command line.
The jig is a custom PCB I have designed that has an ethernet port and built in FTDI for the Omega Serial Port 0.
You could accomplish the same thing using the Omega2+ expansion doc that has the CP2102 on it.
https://onion.io/store/expansion-dock/
Star by plugging in an out of the box Omega into the programmer PCB.
Connecting through S0 which allows a direct connection to the Omega2+ with out needing to join it's adhoc wifi AP or provide login credentials.
The programming jig is connected to a Raspberry pi via USB cable.
A NodeJS script on the Pi connects using the serialport library and sends commands direct to the Omega2+.
The same thing could be accomplished using expect on the Pi instead of NodeJS it's really just what you are comfortable with. I have a web interface to the programmer so NodeJS made more sense.
The script first logs on by sending a new line and waiting for the bash prompt.
Once the Omega2+ boot process is complete and the script has received the bash prompt the script executes a series of setup commands.
One of the fist commands it does is to change the network interface ETH0 over to DHCP so that it can be used to download any repo files needed.
If you are using the expansion doc you would need to configure a WiFi connection from the command line, I do that through the uci utility.
Here is a very high level summary of how to do that with uci.
View the wireless settings.
uci show wirelessChange a setting by doing something like this.
uci set wireless.@wifi-config[0].ssid='YOURSSIDHERE'
... other wifi settings
uci set wireless.@wifi-config[0].key='WIFIPASSWHERE'
Then you have to restart the network with
/etc/init.d/network restartThe script installs git and then downloads custom code from my repo.
git eats up a log of space. You could also just use wget to download source files directly to your Omega if space is an issue.
When it's all done the Pi does a few function tests on the Omega2+ and then toggles a buzzer on the programmer PCB to indicate the process is complete.
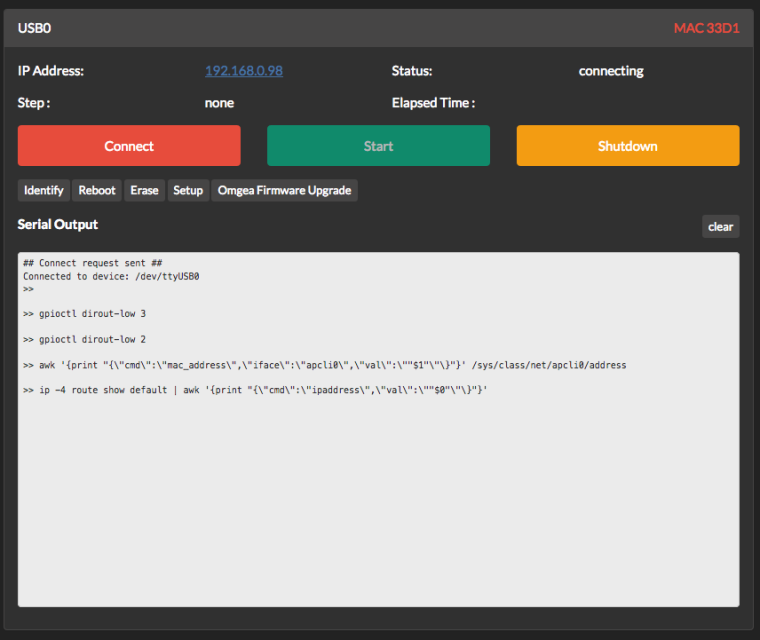
Here is a peek at what the web interface to the programmer looks like.

-
@Jeff-Seese Nice solution!
However, in my case I had to find a way to provision (also, several hundreds) of Omega2, but only connected via Ethernet - without access to the serial port.
The solution was using IPv6: altough a factory-new Omega2 initializes the ethernet at boot, it does not configure a IPv4 address for it. But the ethernet interface does get a IPv6 link local address!
So what I did was using a Linux box (actually, LEDE as well, on an Alix 2D3) with a spare Ethernet port.
When an Omega2 is connected to that port, one can easily find its IPv6 link local address via ping6 (assumingeth2is the separate ethernet interface):ping6 -c 2 -i 4 ff02::1%eth2This is a multicast ping to the all nodes address, and causes all connected devices to respond:
PING6(56=40+8+8 bytes) fe80::1884:720:42ce:499d%en14 --> ff02::1%en14
16 bytes from fe80::1884:720:42ce:499d%en14, icmp_seq=0 hlim=64 time=0.246 ms
16 bytes from fe80::42a3:6bff:fec1:28e3%en14, icmp_seq=0 hlim=64 time=0.765 ms
16 bytes from fe80::42a3:6bff:fec0:cfaf%en14, icmp_seq=0 hlim=64 time=190.962 ms
The responses include answers of the local linux box's own ethernet interface, but as the IPv6 link local address is derived from the device's MAC address, the Omega2's can easily be found: those with IPv6 in the form
fe80::42a3:6bff:fec0:xxxx.Knowing the IPv6, one can now login via ssh using the standard root/onioneer login, and from there do everything needed to provision the device. In my case, that's setting some uboot env vars and then uploading and flashing my own LEDE image.
The only hurdle on that path was automating a password based ssh login to a unknown device. There's a utility called
sshpassthat allows specifying the password on the command line. But there's also the host check that must be overridden - dropbear's ssh can do that by specifying the-yoption twice, but dropbear's scp couldn't do the same, so I had to patch it (just let me know if anyone is interested in that patch).BTW: this also works from any Linux or Mac without separate ethernet port. I needed the separate ethernet segment only for a subsequent test step which involved DHCP and IPv4 that should not mix with my normal LAN.