Cloud API documentation?
-
I was trying to use the device explorer to generate the commands but was getting stuck? I can get status of device with 'i2c_exp' end point successfully
When i try to use 'oled-exp' i am using the following for the parameters:
command: write
options: -c
parameters: ["test"]seems parameters wants a table, this was the only way i could get it to work. I think you maybe have a mistake in there?
Shouldn't it be the other way around?
From docs:
oled-exp [OPTIONS] <COMMAND> <PARAMETER>I believe maybe you transposed the types on options and parameters? options should be table and parameters a string?
-
In the
file/execservice,Tableis an object (envkey: value). I don't understandTabletype foroled-expparams (we don't need keys).You can use
file/execwith{ "command": "oled-exp", "params": [ "-q", "write", "test" ] }works for me
")
I'll try to make
Tableparams working.
-
Have a question to you guys regarding Device Explorer App in the cloud:
How does one actually make it work? Can someone tell me the steps to do, let's say, set the onborard led to heartbeat mode...
Do I need to copy the commands and paste it somewhere? I have no clue on how it actually works the Device Explorer App and any help would be appreciate it.
-
@Koos-du-Preez bit of documentation on the GitHub at https://github.com/OnionIoT/onion-ubus#gpio
@Manuel-Godinez I know many people start with controlling the onboard LED's but I'm guessing that ultimately you will want to control the GPIO pins. Also the LED was a bit flakey for me when I tried but it works up to a point and certainly works with console commands. With the GPIO details below and the syntax from the url you can check out LED's if you want to try.
If you are connected to the Device Explorer via the cloud and enter the correct commands and parameters you can control the pins from the web interface.
So command get and params {"gpio":"0"} will return:
    "success": true,
    "pin": "0",
    "value": "0"
}
Command set and params {"gpio":"1","value":"1"} will return the following and can be checked with a follow up get
{
    "success": true,
    "pin": "1",
    "value": "1"
}
Ultimately some users will want to control the pins via their own web interface or application. So if you obtain an API key and click the Generate Code button it will give you curl, C, Python and NodeJS versions of the required code.
The Device Explorer is considered to be a bit buggy by some people as you have to ensure the data in the fields is not "cached" but if you retype the data in the fields and move to another field it works as expected.
-
@Costas-Costas said in Cloud API documentation?:
{"gpio":"1","value":"1"}
Great, I am just wondering, what option do you choose first, onion, uci or service?
See the following screenshot and it these are the steps to follow?
https://www.screencast.com/t/rS4t3tNDErThanks
-
After much testing, I found the answer
") So now I can use the Device Explorer App from the cloud, but as Costas said, it is always better to control from our own web interface. Thing is, I can't seem to find and PHP examples on using the gpio pins. The code that produces the Device Explorer also, relies on the onion server. Would there be a way to directly connect to the Onion2 instead of going from our own web server to the onion server and then to the Omega2????
So now I can use the Device Explorer App from the cloud, but as Costas said, it is always better to control from our own web interface. Thing is, I can't seem to find and PHP examples on using the gpio pins. The code that produces the Device Explorer also, relies on the onion server. Would there be a way to directly connect to the Onion2 instead of going from our own web server to the onion server and then to the Omega2????
-
@Manuel-Godinez strange screenshot you have for the Onion ubus. Actually that is the Service ubus but I guess you found Onion ubus.
If, like me, you are not easily able to translate C, Python and NodeJS to PHP then what you can do is use one of the many online converters. If you enter the curl command at https://curl.trillworks.com/#php it will return the PHP code for you.
Regarding the different servers what I do to remove the Onion servers is go via Blynk http://www.blynk.cc/getting-started/
Blynk have an opensource server on the cloud and you can use their's, host yours on the cloud or have a local server with port forwarding etc.
-
@Costas-Costas Yes, after much trial and error I got the PHP code to work now
Thanks though for the online converter, it might come handy in the future.I had use Blynk with Arduino but not that much, only a few tests and did something else. Will take a look at it again.
Thanks!
-
@Manuel-Godinez I have used Blynk with Arduino's but I have found it works better with MCU's that have inbuilt WiFi.
The setup details provided by Omega for Blynk are at https://wiki.onion.io/Tutorials/blynk-library
It needs an update for the Omega +2 pinout but the developers at Blynk have it in their roadmap. Meanwhile you can just use pins that were common to the original Omega and the new 2's. You need a 2+ or a 2 with USB Stick to run Blynk.You can see a screenshot of Omega 2+ with Blynk in this thread http://community.onion.io/topic/1115/the-onion-thermostat/7
-
@Costas-Costas Sorry for my ignrance but what do you mean that I need an Omega2+ or Omega2 with a USB flash drive???
-
@Manuel-Godinez it will run on an Omega2+ as it is but not enough space on a regular 2.
It needs around 11MB and a stock Onion is about 1 to 2MB short. Might be you could remove some stuff if you didn't want to run from a USB stick on a regular 2.
-
I am trying to use IFTTT to send a web request to my Omega 2+ to switch on GPIO 0. However, I can't seem to get the right format for IFTTT. The data shown in the attached screenshot generates an error in IFTTT about the use of {{
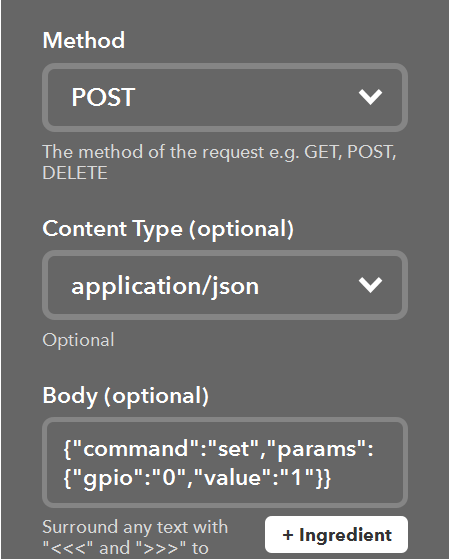
Any idea what I am doing wrong?
-
Solved it! You need to add a space in between the last two curly brackets.
-
Before using the above method to turn on a GPIO using IFTTT, I should also point out that you need to set the relevant GPIO pin as an output first. You can do this with a separate IFTTT Applet. I haven't been able to concatenate two GPIO command strings in one IFTTT Applet (i.e. send {"command":"set-direction", "params":{"gpio":"0", "value":"output"} } then send {"command":"set","params":{"gpio":"0","value":"1"} } ).
Anybody know if this is possible?
-
https://sdk.onion.io/reference/onion-cloud-APIs/device-api.html
Yeah! Documentation!
-
This post is deleted!
-
@Steve-Smythe I was able to use launch-process to run a quick script. You could write a script to set direction of the gpio pin and then to execute high or low. I got it to work in the ifttt channel.
-
@Steve-Smythe and others.
Does the following syntax still work for you with IFTTT?
https://api.onion.io/v1/devices/<device-id>/i2c_exp/oled-exp?key=<API-key>The Maker Webhooks channel doesnt seem to work with this URL and any JSON I use in the body. I believe it's returning "Missing Authentication Token".
I've followed the steps outlined here, but they may be stale?