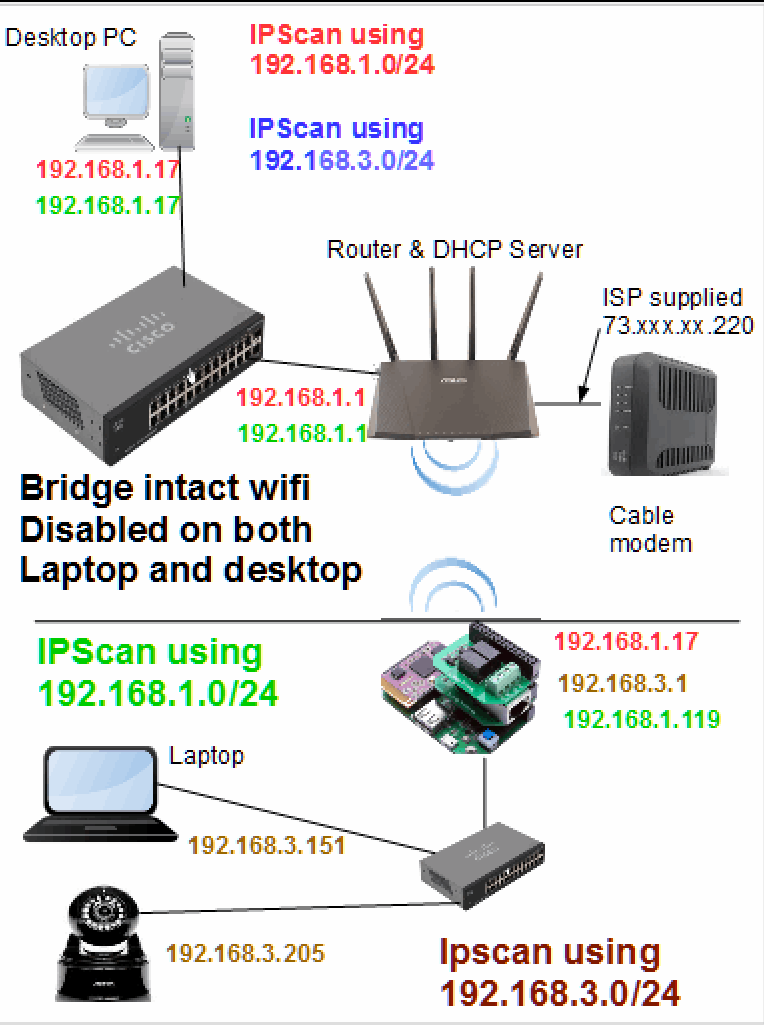
If the tutorial is understood correctly there are two ways to achieve the
bridging of the Wired Ethernet to the Wireless Ethernet.
"There are several ways to do so, one of the ways is to modify the firewall configuration."
"There is another tutorial (as I said)"
The first of which is modifying the /etc/config/network file.
The second is modifying the /etc/config/firewall config file.
We will go with the first example.
Before getting to the above there is a 'link' in the tutorial
guiding you to setup the Omega Wifi. They are preliminary steps
to connect to AP on the Omega and select Wireless LAN to connect to.
Here are the steps followed.
Connect Omega with WiFi AP
Connect, in my case, the Desktop PC to the wireless AP on the Omega.
Once complete, using the browser connect to the Omega Console select
settings>Wifi Settings>Enable WiFI>Add WiFi Network.
Alternatively if the browser fails to connect setup the serial port
connection shown below.
Setting up using Command Line – Windows
Download and install the Silicon Labs CP2102 driver for Windows.
Run wifisetup in the serial terminal, and follow the prompt to
connect the Omega to your Wi-Fi network.
# wifisetup
Run oupgrade in the serial terminal, this will update the Omega to the latest firmware.
Now we are going to do is to first enable the Omega's ethernet connection via
network coinfig file.
Uncomment the following and add option hostname 'OnionOmega'
config interface 'wan'
   option ifname 'eth0'
   option proto 'dhcp'
   option hostname 'OnionOmega'

# /etc/init.d/network restart
Following the restart SHOW RESULTS OF ifconfig -a command below.
# ifconfig -a
eth0      Link encap:Ethernet  HWaddr 40:A3:6B:C1:19:XX
          inet6 addr: fe80::42a3:6bff:fec1:19XX/64 Scope:Link
          UP BROADCAST RUNNING MULTICAST  MTU:1500  Metric:1
          RX packets:0 errors:0 dropped:0 overruns:0 frame:0
          TX packets:28 errors:0 dropped:0 overruns:0 carrier:0
          collisions:0 txqueuelen:1000
          RX bytes:0 (0.0 B)  TX bytes:6727 (6.5 KiB)
          Interrupt:4

lo        Link encap:Local Loopback
          inet addr:127.0.0.1  Mask:255.0.0.0
          inet6 addr: ::1/128 Scope:Host
          UP LOOPBACK RUNNING  MTU:65536  Metric:1
          RX packets:3024 errors:0 dropped:0 overruns:0 frame:0
          TX packets:3024 errors:0 dropped:0 overruns:0 carrier:0
          collisions:0 txqueuelen:0
          RX bytes:205632 (200.8 KiB)  TX bytes:205632 (200.8 KiB)

wlan0     Link encap:Ethernet  HWaddr 40:A3:6B:C1:19:F4
          inet addr:192.168.3.1  Bcast:192.168.3.255  Mask:255.255.255.0
          inet6 addr: fe80::42a3:6bff:fec1:19f4/64 Scope:Link
          UP BROADCAST RUNNING MULTICAST  MTU:1500  Metric:1
          RX packets:197 errors:0 dropped:0 overruns:0 frame:0
          TX packets:233 errors:0 dropped:0 overruns:0 carrier:0
          collisions:0 txqueuelen:1000
          RX bytes:21536 (21.0 KiB)  TX bytes:36555 (35.6 KiB)
The next step is to try to bridge the wireless internet connection with ethernet connection.
YOU CAN MERELY UNCOMMENT TH SECTION BELOW IN THE NETWORK CONFIG FILE.
You can merely uncomment the section shown below in the network config file.
config interface 'lan'
  option ifname 'eth0'
  option type 'bridge'
  option proto 'static'
  option ipaddr '192.168.3.1'
  option netmask '255.255.255.0'
  option ip6assign '60'

Reboot
Here are the results of the ifconfig command after uncommenting the above lines.
ifconfig
br-lan    Link encap:Ethernet  HWaddr 40:A3:6B:C1:19:XX
          inet addr:192.168.3.1  Bcast:192.168.3.255  Mask:255.255.255.0
          inet6 addr: fe80::42a3:6bff:fec1:19XX/64 Scope:Link
          UP BROADCAST RUNNING MULTICAST  MTU:1500  Metric:1
          RX packets:329 errors:0 dropped:0 overruns:0 frame:0
          TX packets:76 errors:0 dropped:0 overruns:0 carrier:0
          collisions:0 txqueuelen:0
          RX bytes:46309 (45.2 KiB)  TX bytes:10161 (9.9 KiB)

eth0      Link encap:Ethernet  HWaddr 40:A3:6B:C1:19:XX
          UP BROADCAST RUNNING MULTICAST  MTU:1500  Metric:1
          RX packets:681 errors:0 dropped:7 overruns:0 frame:0
          TX packets:140 errors:0 dropped:0 overruns:0 carrier:0
          collisions:0 txqueuelen:1000
          RX bytes:158882 (155.1 KiB)  TX bytes:32401 (31.6 KiB)
          Interrupt:4

lo        Link encap:Local Loopback
          inet addr:127.0.0.1  Mask:255.0.0.0
          inet6 addr: ::1/128 Scope:Host
          UP LOOPBACK RUNNING  MTU:65536  Metric:1
          RX packets:289 errors:0 dropped:0 overruns:0 frame:0
          TX packets:289 errors:0 dropped:0 overruns:0 carrier:0
          collisions:0 txqueuelen:0
          RX bytes:19660 (19.1 KiB)  TX bytes:19660 (19.1 KiB)

wlan0     Link encap:Ethernet  HWaddr 40:A3:6B:C1:19:F4
          inet addr:192.168.3.1  Bcast:192.168.3.255  Mask:255.255.255.0
          inet6 addr: fe80::42a3:6bff:fec1:19f4/64 Scope:Link
          UP BROADCAST RUNNING MULTICAST  MTU:1500  Metric:1
          RX packets:0 errors:0 dropped:0 overruns:0 frame:0
          TX packets:42 errors:0 dropped:0 overruns:0 carrier:0
          collisions:0 txqueuelen:1000
          RX bytes:0 (0.0 B)  TX bytes:8786 (8.5 KiB)
There is no bridge functioning that can be seen as the brctl show
confirms. The bridge was not established.
# brctl show
bridge name     bridge id               STP enabled     interfaces
br-lan          7fff.40a36bc119XX       no              eth0
Next will try the second method mentioned in the tutorial.
There are several ways to do so, one of the ways is to modify the firewall
configuration.