Simple Python wrapper and demo
-
Hey guys,
Received a bunch of LEDs/resisters/buttons/switches/wire etc in the mail yesterday, so finally got stuck in actually doing something (basic) with my Omega.
I'm definitely keen on using JS to write programs for Omega, but since we don't have that yet, I'm using Python. Also, rather than spawning child processes (like
fast-gpio) I'm reading/writing to file descriptors in/sys/class/gpio/Of course, for this to work you'd need to install python-light which can be installed using
opkg update; opkg install python-light.First up we have a little helper class. It pipes values directly into the exported files, which I guess is a lower level of interacting with the pins. I'm probably doing something silly, or not doing something I'm supposed to be doing, but it's working fine for me so far so whatevs!
# gpiohelper.py

class GPIOHelper(object):

	exportPath = "/sys/class/gpio/gpiochip0/subsystem/export"
	pinDirectionPath = "/sys/class/gpio/gpio$/direction"
	pinValuePath = "/sys/class/gpio/gpio$/value"
	pins = [0, 1, 6, 7, 8, 12, 13, 14, 23, 26, 21, 20, 19, 18]

	def __init__(self):
			for pin in self.pins:
				fd = open(self.exportPath, 'w')
				fd.write(str(pin))
				fd.close()

	def setPin(self, pin, value):
			# Set direction as out
			fd = open(self.pinDirectionPath.replace("$", str(pin)), 'w')
			fd.write("out")
			fd.close()

			# Set value
			fd = open(self.pinValuePath.replace("$", str(pin)), 'w')
			fd.write(str(value))
			fd.close()

	def getPin(self, pin):
			# Set direction as in
			fd = open(self.pinDirectionPath.replace("$", str(pin)), 'w')
			fd.write("in")
			fd.close()

			# Get value
			fd = open(self.pinValuePath.replace("$", str(pin)), 'r')
			out = fd.read()
			fd.close()

			return int(out)
Then the code for my lil row of LEDs with button for input. When the button is pushed, the LEDs turn on in order, then turn off in order.
# gpiotest.py

from gpiohelper import GPIOHelper
from time import sleep

# Initialize the helper
helper = GPIOHelper()

# Define some pins
ledPins = [0, 1, 6, 7, 14, 13]
buttonPin = 26

# Function which does the light show
def lightEmUp():
	# Lights on
	for pin in ledPins:
		helper.setPin(pin, 1)
		print "Turning on pin {}".format(pin)
		sleep(0.1)

	# Lights off
	for pin in ledPins:
		helper.setPin(pin, 0)
		print "Turning off pin {}".format(pin)
		sleep(0.1)

# Continually check the value of the specified pin. If it returns 1, then light em up!
while True:
	if helper.getPin(buttonPin):
		lightEmUp()
Looking forward to the offical wrappers and IOT.JS/Node!
-
Awesome cheers for this, I've got some leds/buttons on their way and have been looking for something like this as a starting point!
-
Awesome!
Cool if we incorporate this/parts of this in our official wrapper?Also, just a point of order about fast-gpio, it only spawns child processes to run software-based PWM. The regular GPIO functionality (set, read, set direction, etc) runs with just the one process.
-
@Jamie-Street np!
@Lazar-Demin Of course I don't mind if/how you use any code I post here, but I can't imagine my method is any better than wrapping a C library!
Also sorry, that sentence was ambiguous — I meant that I didn't want to spawn a child process like
fast-gpioin that I don't want to have to dosubprocess.call(["fast-gpio", "set", "5"])or whatever due to the overhead of running another program each time you want to set/read a value")
-
@Dan-L thanks this is great! Any chance you could show an example on how to turn on / off a led using the Arduino Dock?
-
@Romans-Bermans Hmm, not sure! I don't have that dock so I'm not sure how you go about interacting with it sorry.
Perhaps @Lazar-Demin or @Boken-Lin have some ideas?
-
Boom! Works perfectly!
Just for newbies like me (@Dan-L correct me if I am wrong but this is working for me):
Make sure to nano and save pyhelper.py in this directory: /usr/lib/python2.7/importlib
and
change <from gpiohelper import GPIOHelper> to <from pyhelper import GPIOHelper>FYI, I named your files the same as the first line with the hash
Thanks again, Dan!
-
@Nick-Bonifacio Ah, oops I meant for that to be "gpiohelper.py" rather than "pyhelper.py"! Have updated my original post.
I'm not really a Python coder myself so no idea if putting stuff in
/usr/bin/python2.7/importlibis best practice or not. But if it works it works!

-
@Dan-L I don't think it is best practice haha. Hopefully, someone will chime in and tell us where it goes. What did you end up doing with it?
-
I just had both files as:
/root/test/gpiohelper.py
/root/test/gpiotest.pyWritten directly with Nano

-
@Dan-L. : thanks for sharing.
how have you connected the LEDs? do you use any pull-up resistors or do you go directly from IO-pin to GND?
thanks!!
-
Thanks @Dan-L Will give the Arduino Dock a go tonight and maybe will manage to figure it out.
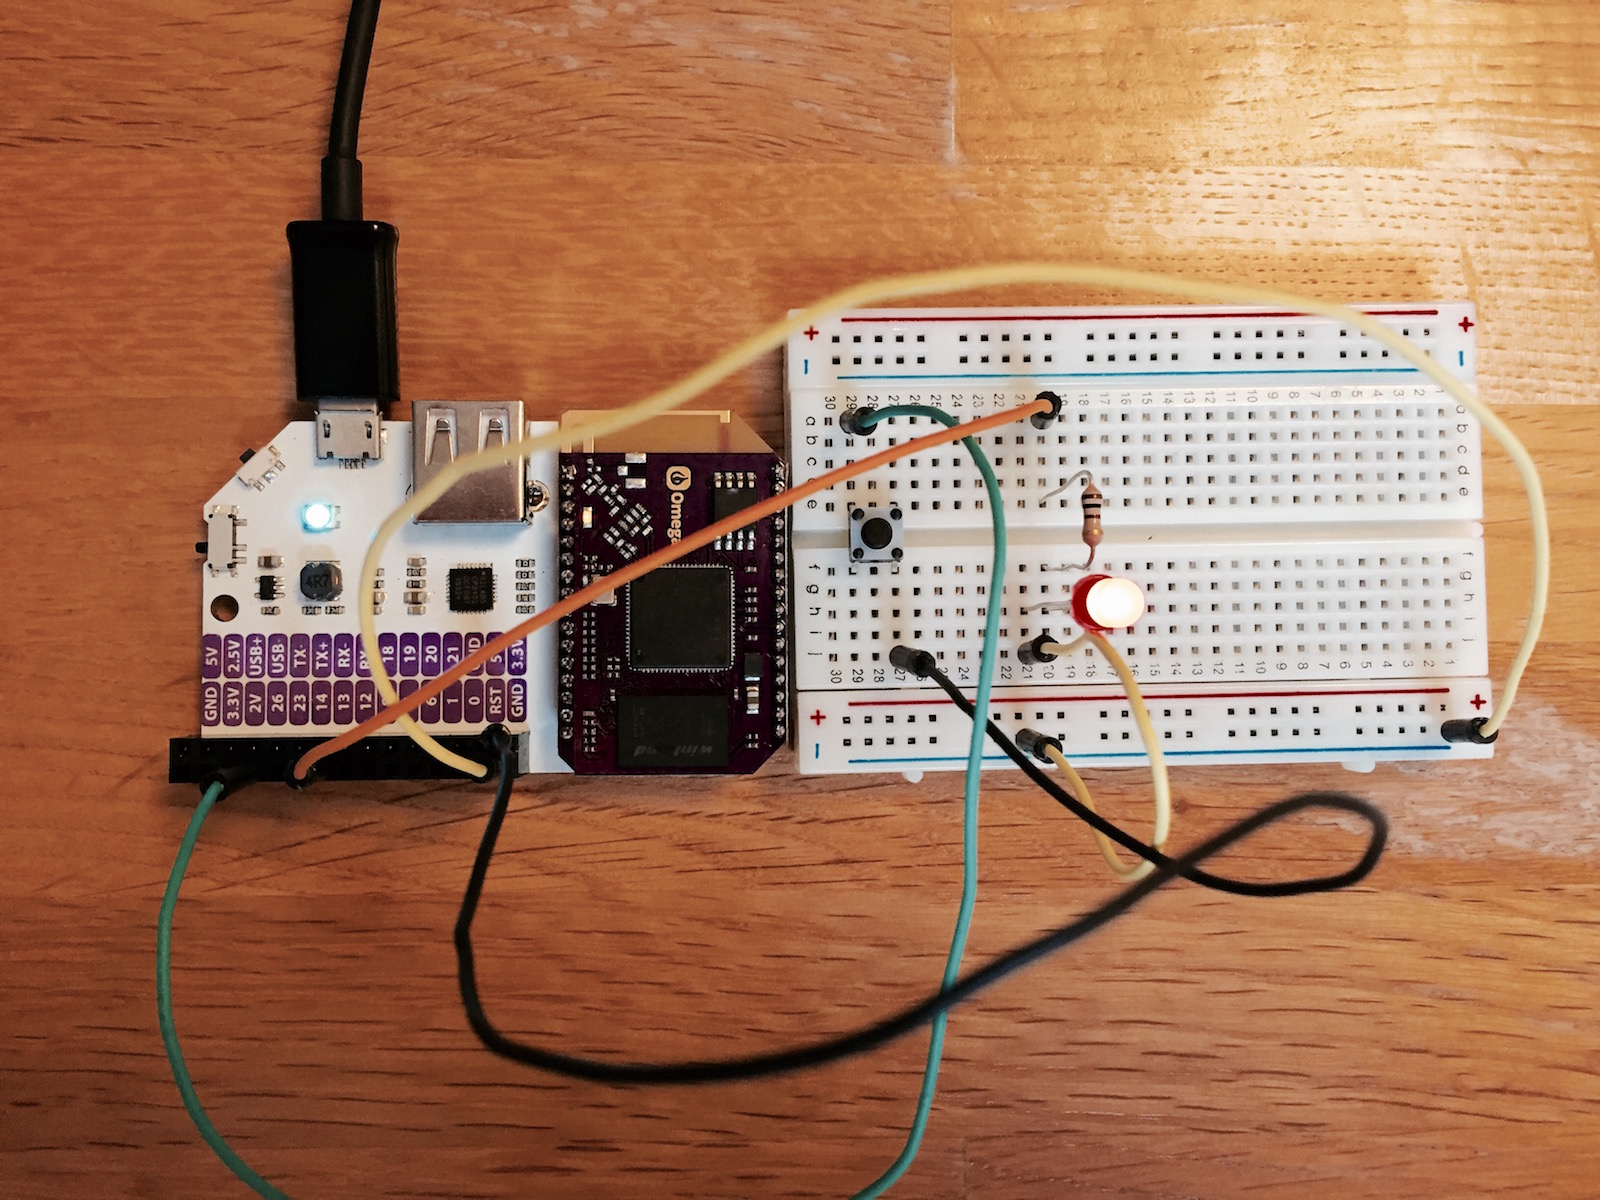
@gosch I have attached a photo of how I connected one LED (led pin 13) with one button (button pin 26) and used @Dan-L code to get it to work.
-
Hi @gosch, I started off with this.
Basically connecting a GPIO pin to a 330ohm resister, then the resister to the LED (longer leg), then the LED to ground. For my example code though, I was using 6 LEDs with 6 resisters, with the ground pin of each chained together and linked to a single ground pin on my expansion dock.
I also set up a button using an Arduino guide I found here.

-
Nice one @Romans-Bermans!
-
@Romans-Bermans: thanks for the picture!
@Dan L.: thanks for the info & links!
-
Hey @Dan-L , finally got some components to play around with!
Although I'm getting the following error when trying to read the input of a button using your helper,
fast-gpio read 8works perfectly though, any ideas?Traceback (most recent call last): File "script", line 19, in <module> button_input = helper.getPin(8) File "/root/first_script/gpiohelper.py", line 26, in getPin fd = open(self.pinDirectionPath.replace("$", str(pin)), 'w') IOError: [Errno 13] Permission denied: '/sys/class/gpio/gpio8/direction'
-
@Jamie-Street Know what? I have the same problem with pin 8. If you try a different pin does it work?
I also have trouble with pin 13, but it doesn't actually give errors, it just doesn't do anything.
-
BTW You can test easily with the command line too.
echo out > /sys/class/gpio/gpio5/direction
echo 1 > /sys/class/gpio/gpio5/valueecho in > /sys/class/gpio/gpio6/direction
cat /sys/class/gpio/gpio6/value
-
Cheers for the heads up, upon inspection it looks like the
directionfile is missing for pin 8, pretty strange.. perhaps the helper should create the file if it doesn't already exist?
-
@Jamie-Street The helper doesn't specifically create those files individually, it triggers the export functionality. I'd say it's a bug with the Omega firmware...