Dash — be *very* careful plugging in the power
-
@crispyoz thanks for letting me know! It looks like the factory tried to glue it down but didn't apply enough to even reach the connector (or it spilled out — there's a stain on the board below the connector.)
-
@Sarah-Clark Please get in touch with Crowd Supply and they will arrange for a replacement unit. https://www.crowdsupply.com/contact
In the meantime, you can still use this unit by supplying 5V power through the expansion header and connecting with SSH.
More info here:
https://onion.io/omega2-dash-guide/#gpio
http://docs.onion.io/omega2-docs/connecting-to-the-omega-terminal.html#connecting-to-the-omega-terminal-ssh
-
Wow... did I ever overreact to this thread!
I responded by applying Gorilla clear glue to the connector. Some of the glue seeped inside and made the connector unusable.
No problem I thought. I’ll just connect power to the header. Got the connections backwards. Bye bye Dash!I have ordered another and shall self flagellate until it arrives.
-
@Ian-Smith a great learning experience
")
-
I don't have an Omega2 Pro but I did compare this to my Omega2 LTE, (which uses a USB-C connector but otherwise the same attachment design) and it's pretty clear this is a manufacturing issue so I hope Onion takes note and corrects for future runs.
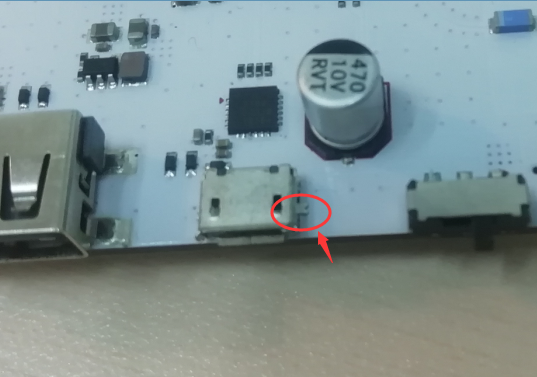
The issue is that the support tabs should be inserted into the holes on the PCB. Instead, they are flattened out to the sides but there are no pads to solder them to for anchoring. This leaves all the support on the backend of the connector and the pins are not strong enough to provide structural support so that really just leaves the two rear anchor pads. And I can't clearly see the underside of the rear part of the connector but it looks like there's very little contact with the pads. Based on the dimensions and how much of the pads are exposed, it looks like less than a third of the pads is actually making contact with the rear part of the connectors, which is very thin metal under plastic.
Axial force will break off this connector easily.
I wouldn't recommend a novice attempt this but if you have decent soldering skills (and, ideally, a rework station or hot air gun with nozzles to assist) you could remove this connector from the PCB, bend the tabs to fit into the slots on the PCB to resolder. This will almost certainly void the warranty but if you have decent soldering skills, you probably void warranties all the time.
Otherwise, you have to be very careful with how you connect a cable and make sure the cable is not applying weight which will cause the connector to pivot along that rear axis of the connector. It appears that there is adhesive under the connector to add some strength but superglue is a poor substitute for solder and may have, in fact, compromised the integrity of the existing solder joints. And it looks like the superglue might not make good contact with the front of the connector as it's slightly raised from the base.
-
@antelm1978, I just checked my two Dashs which arrived a few days ago. As you said, the lugs have been flattened and not inserted into the plated through holes and soldered. So this is definitely poor manufacturing and could easily be rectified. I'll be putting mine in boxes and will be very careful to preserve them until that time.
Regds,
Dave
-
I've thought about how I want to solve this and since I plan on designing some sort of 3D printable case or housing, I will just be sure to add some bracing on the top of the connector to hold it down and make sure it doesn't flex. I'm not sure when I will have time to tackle this but when I do, I can make available to the community.
-
I just checked my Beta device, it has the same construction, so I added a support in my wall mount case to hold the USB from being bent upwards.
-
We've taken some time to look into this. It turns out a mix of two different MicroUSB port parts was used in the first Omega2 Dash production run.
Here's the part with support tabs - used in many other Onion products:
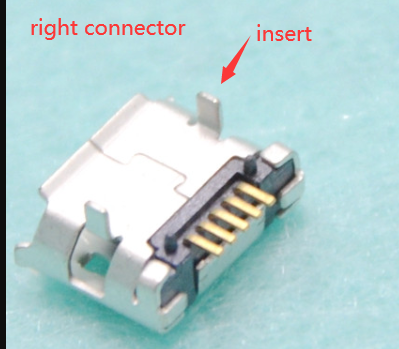
And here's the tab-less (legless?) part:
But no cause for concern
From what we can tell, @Sarah-Clark's experience with the tab-less MicroUSB port is not the norm. The failure of the port was likely due to a manufacturing defect specific to that board. This board will be replaced
Your Omega2 Dash will work as expected regardless of the MicroUSB port type, and will withstand MicroUSB cables being plugged in and unplugged.
If you have an Omega2 Dash with a tab-less MicroUSB port and are feeling nervous, we suggest taking extra care when plugging in or unplugging cables. For example, holding down the port with a finger and taking care not to place upward pressure on the cable/port.
Going Forward
We've talked with our CM to adjust which parts are ok to use. Going forward, we will only use the part with support tabs. That goes for all Onion products, not just the Dash!
-
Thanks Lazar.
Good tosee the swift action.
In my case, I'm running off LiPo via an LDO regulator directly to the 3.3V input so not using the USB input on the Dashs.
I determined that 3.3V can be connected to the secondary of the switching regulator used on the Dash with no problem (when no USB power connected). At worst, the top FET in the regulator will turn on, connecting some extra capacitance across the output- which is a good thing should it happen.
Regds,
Dave